GuestQueue Help Center

Importing Guests

Import multiple guests into an event using GuestQueue’s downloadable guest template.

1

Select the guest list and event

Open the import page and choose where the imported guest records should be added.


Guest list

Select the guest list that should receive the imported guests.

Venue

Select the venue associated with the event.

Event date

Select the event date for the guests being imported.

Send email confirmation

Leave this option enabled when guests should receive a confirmation email after they are imported.

Enabled automatically: The confirmation option is selected by default. Clear the checkbox before importing when confirmation emails should not be sent.
2
Recommended File import

Download the import template

Use the GuestQueue template to ensure that your spreadsheet contains the expected columns.

Steps 2-4 apply when importing guests from a file.


Use the import page template

The template link appears above the spreadsheet example on the Import Guests page.

  1. 1
    Download the template

    Select the blue template link displayed near the top of the import form.

  2. 2
    Complete the spreadsheet

    Add your guests while preserving the template column names and order.

  3. 3
    Upload the completed file

    Use the Import File field to choose the completed XLS, XLSX, or CSV file.

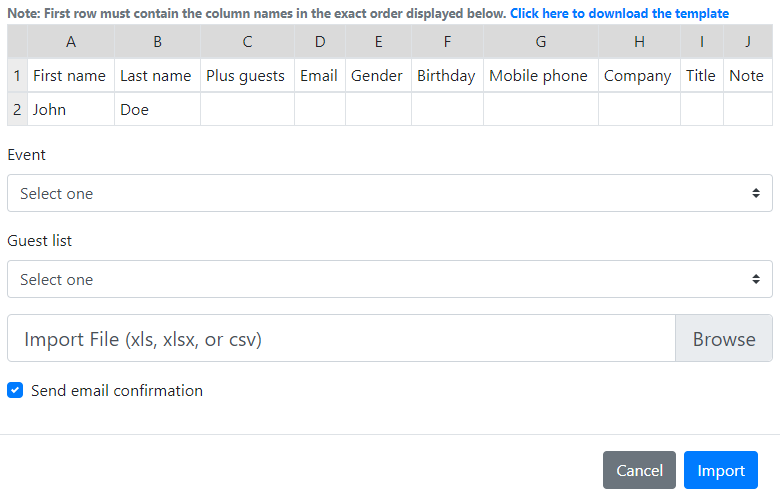
GuestQueue – Import Guests
GuestQueue Import Guests screen showing the spreadsheet template link, event selector, guest list selector, file upload field, and send email confirmation option.
The Import Guests screen includes the template download link, import destination fields, file picker, and confirmation-email option.
3

Prepare the guest import file

Add each guest to the template and save the completed spreadsheet in the recommended file format.


First name

Required

Enter the guest’s first name in the corresponding template column.

Last name

Required

Enter the guest’s last name in the corresponding template column.

Plus guest

Required

Enter the number of additional guests allowed for the guest record.

1

Keep the template headings

Keep the first row and preserve the column names in the exact order displayed in the downloaded template.

2

Add one guest per row

Enter each guest on a separate spreadsheet row and complete all required columns.

3

Save as CSV

Saving or exporting the completed spreadsheet as a CSV file is recommended.

4

Upload and review the import

Upload the completed file and confirm the import details before submitting it.


  • Confirm the correct guest list, venue, and event date are selected.
  • Verify that the confirmation-email option matches your intended workflow.
  • Make sure every row includes the required first name, last name, and plus guest values.
Adding one guest?

Use the individual guest form

Add a single guest manually when you do not need to upload a complete spreadsheet.